Showing posts with label recycled yarn. Show all posts

Monday, March 23, 2009

The Middle One Gets a Halter Top


I've decided to just keep going in order and ask each kid what they want me to knit when it's their turn, then I'll post my FO's here.

Ok, so hot off the needles...well, hot last night anyway, is a cute spring halter style top with a one button adjustable closure. She loves it! It was so simple that it's really just plain scary. I love simple knitting :)


Ok, here's the pattern:

Cast on 100 sts on size 3 circs, with the long tail cast on method, join and knit 1x1 rib for a couple/few inches

Change to size 5 circs and knit stockinette st (I tossed in some random stripes as I went, no rhyme or reason) for 7-8 inches give or take an inch or two to fit your desired recipiant.

Change back to size 3's and knit about 1.5 inches of 1x1 rib.

Cast off in rib fashion on size 5's

Grab the tail yarn from your cast on, and pick up 10 sts for the strap.

Knit garder stitch for about 12 inches, then add a button hole...starting at the beginning of a row, K5, BO2, K3, next row, cast on those 2 sts that you bound off and viola you have a button hole (you may need to make a button hold bigger then 2 sts, mine was actually a bead).

K2 rows, add button hole, k 2 more rows, add another button hole, K 2 more rows, then cast off, weave in end, attach button and put it on your kid and revel in your talent :)


This pattern is for personal use only. I charge a small fee for the right to sell your finished product. Please email me at : shelleefloyd@gmail.com for more info. Thanks :)

Saturday, November 8, 2008

A New Scarf


So I've been feeling a little unfashionable lately since I don't have a super cute, skinny, floppy scarf to wrap around my neck a gazillion times. So I made one. A couple relativity new things happened while I was thinking about making one. A) I'd have to knit it flat. That's like blasphemy in my world...I mean, flat knitting, that's so 1909 ya know? But, there was just no way around it, to get the flat item I desired, I'd just have to suck it up and knit flat. I did NOT however, use straight needles, that has been deemed as highly inapproprite and is against my knitting religion and would get me one pass straight to hell. So, I grabbed my biggest circs and went right at it. B) I knit the whole dang thing in the knit stitch, or the garder stitch. That is an absolute first for me, well, not a first first but I stopped knitting garder stitched projects mere weeks into my knitting career. I love simple, easy on the eyes projects and I also love lace projects but not too lacy, so I thought that if I knit in garder stitch with huge needles and with my unspun, or flat, recycled yarn, the stitches would be open and loose enough to pass for lace in my eyes. I was right, it's obvious to even the most inexperienced knitter that this is garder stitch, I'm not denying that fact, but it's knit loose enough that it pleases me and it is my scarf after all, and I love it!

It's roughly 5 feet long.

I used about 200 yards of light sport weight, recycled, unspun, hand dyed cotton yarn from my own stash. I used US size 11 needles and cast on 25 stitches, knitting every row until the yarn was gone.

And now I feel very fashionable and can keep up with the average Miss Jones ;)


Except for my big ass nose that is.

Sunday, November 2, 2008

Tis The Season For Beer Cozies!

I gave away all the beer cozies I made last year except for the prototype so I thought I deserved my very own new one. This is the one I made today.


The pattern is my own and it can be found here

It's a very quick knit and would make a great present this holiday season for that special beer drinker in your life :)

I used my very own recycled, respun, hand dyed yarn and I just LOVE the color!

Now, the yarn itself, wasn't really "complete". I hadn't "set the twist" yet, so you can see in the pic that the finished item itself, twists a bit to the left. It's mine, so it's just no biggie.

Tuesday, September 30, 2008

Girl's Knitted Dress

This to me AGES to complete. Not because it's hard, just because I was busy doing other things like shopping for old stuff or playing with toys LOL. So here it is:


I used this pattern that I created awhile ago, and I just increased the stitches about mid chest. I think I increased every one to two stitches but it's been so long that I just totally forget.


So there you have it. A cute little knit dress for virtually all seasons. It's going to look great with tights and a long sleeve undershirt.

Saturday, February 23, 2008

It won't be long now.

I'm having an awesome time with my wheel. I hope to start listing things by next Friday. Cross your fingers for me!

Thursday, February 21, 2008

And this is what she spins folks

So this is how I'm using my spinning wheel. I'm plying my recycled yarn together and giving it a twist. Pretty simple and VERY pretty.

Here are two balls of unspun cotton recycled hand dyed yarn


This is a bit of those two yarns spun together:


That's the spindle storing the yarn

This is the finished product. very pretty huh?

Wednesday, February 20, 2008

She spins folks, she spins!


Yes folks, she works! Hub made her and then we tweaked her. I was about to go insane when I grabbed my glue gun, some wooden blocks and a couple tinker toys. I'd already done enough damage to the poor thing (I may go into more detail some day, when I get sick of spinning) so I just went at it armed and ready and she works! She needs a much bigger wheel, the spindle is a bit wobbly, but she does exactly what I need her to do.

I'm going to let my kids go at her with some watercolors soon and she'll be the grooviest little wheel on the block! Most likely the only wheel on the block but groovy nonetheless.

Friday, February 8, 2008

Easy Yarn Doll


I made this in about 20 minutes and I feel an obsession coming on. I got the instructions here.

Now go make some yarn dolls!!

Saturday, January 5, 2008

Like my yarn?


If you've been with me awhile, you know I sell hand dyed, (mostly cotton) recycled yarn. If you love my yarn, you're about to love it even more! I'm learning to respin it! I'm learning to re ply it so that it looks, feels and acts more like brand new yarn, still with the eco-friendly, Earth loving reality to it. I've been busy spinning and knitting to test my yarn before I release it for sale. My hub is busy making me a respinning wheel so I can crank out the respun yarn like nobody's business! Until then, I'm marking all previously listed yarn down 50% in an effort to clear some space for my new yarn stock.

As I said, I've been spinning and knitting to test my new yarn and since I'm a wannabe designer, I should have plenty of free knitting patterns here on my blog by the time I release my new line of respun yarn.

Thanks for you patience and thanks for your continued support in my yarn adventure.

Shellee

Wednesday, December 26, 2007

Plying with a drop spindle

As I mentioned in my last post, my honey made me a CD drop spindle. We did modify it a bit. We added a hook to the top to make it easier from me to use. We added another CD to make it heavier since I'll be working with fairly large quantities and we made the dowel a bit longer then suggested to give me more space on the shaft to store the yarn.

I took two skeins of my beautiful, recycled, cotton, LWI dyed yarn,


wound them into center pulls


then started plying them together.


It took me awhile to figure out how to use the spindle. I thought it would be one continuous motion, rather then spinning a length of yarn, winding it around the spindle shaft and repeating for hours and hours.

I fell in love almost immediately. I never realized how much better it would make my yarn.


Each skein was approximately 200 yards, and I grabbed the yarn from each end of the balls, so I was plying 4 strands together, to get a total of 100 yards

Now, ideally, I'd skein it, wet it, hang and weigh it down to set the twist and to take out the recycled curliness, but I just couldn't wait, so one lucky dolly (Karen) got a nice new sweater!


The difference in the plied recycled yarn vs. non plied is truly amazing. I think I could have even put more twist on it and it would have been even nicer, but, alas, it was my first try.

I don't think I'll be selling the plied yarn until I get a wheel though simply because working in the quantities I do, and using a spindle, it would take me forever and a day and cost my customers a fortune.

Low water immersion dyeing of recycled cotton yarn

I felt so adventurous the last few days even though it was a holiday. We celebrated with love and peace and presents on the first day of winter so my 24th and 25th of December were left wide open for relaxing, playing and crafting. And my honey was able to catch up on his "honey do" list. One thing on that list was making me a drop spindle, but we'll get to that a bit later. First lets look at my low water immersion (lwi) dyeing of yarn. I've done this process with clothing before but not with yarn. I've been thinking lately that I'd really like a daytime way of dyeing, a way that's not very messy, has little set up and break down, something I can do with the kids around, so I figured that lwi was the way to go.

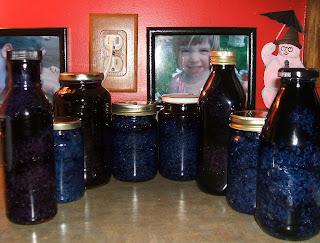
First I dismantled and skeined a sweater, and shoved each skein into a glass jar:


This is 200 yards short of a whole sweater, I just couldn't for the life of me find one more jar in the house.


Then I poured my fiber reactive dye (since I'm working with plant fiber (cotton)) right on top of the dry yarn. I used a funnel at first then quickly ditched it since it really was serving no purpose:


I used only two colors: marine violet and medium blue procion dyes. You most certainly can put more then one color in the same jar, it would look super groovy, but I was on a simple experimental mission, so I used one color per skein/jar. I filled the jars with dye, made sure I could see no white, shook it up if I needed to, then I poured off the excess dye so that I had room to pour in some soda ash solution. Soda ash is a fiber reactive dye fixer, it keeps the dye colorfast for years. You cannot expect to get good results without it. So I mixed some up (directions are on the label) and poured as much as I could into the jars, put the caps on and shook it gently a few times. Then I let them sit and cure for a couple hours while I did other stuff.


Then when I felt they has cured enough, I filled up one basin of my kitchen sink with cool water, opened up the jars, poured out the excess dye/soda ash solution into the empty sink, and dunked the yarn into the cool water and squeezed/rung them out well. I then plopped them into a mesh laundry bag and washed them in the machine on cool and dried them on cool.


They were a bit tangled when I took them out of the bag, but I'm not afraid of a few knots, so I took them out, untangled them, then threw them back into the dryer out of the bag to finish drying.

They turned out so beautiful!

Wednesday, October 24, 2007

How to unraval a sweater to use its yarn

I'm going to attempt to show you all how to unravel a sweater:

First, as you are shopping, there are some important things to consider:

Gauge: Most recyclers like to work with only medium or heavy yarn, it's very easy to unravel, I suggest starting with a heavy gauge until you master the process. I prefer DK weight and then I can double, triple or even quadruple the gauge for a heavier finished yarn.

Fiber content: Why waste your time with acrylics when you can find a nice 100% cotton or cotton blend such as cotton/linen/ramie? The price is generally going to be the same, so why not go for the nicer fibers? You can find nice wool if that's more up your ally. I've found plenty of merino wool sweaters.

Seams. The seams are VERY important. You'll need to check the seams to make sure they are KNIT together (or sewn with yarn that is), not sewn/serged with a machine. The machine serged sweaters will give you little strips of yarn instead of a continuous thread. Here is a pic of the inside of a proper seam:


You may find a serged seam at the shoulders, even though the other seams have been sewn/knit with yarn. Never fear! Just cut the seams apart with your scissors, you'll loose a bit of yardage, but not enough to really matter.


Ok, lets get started!


First I cut the tag off gently, stitch by stitch with very sharp scissors (I started out by using a seam ripper, I suggest newbies do the same). Once you've got the tag off, you're ready to get at the good stuff. Oh, don't forget to check if there's a tag inside the sweater on the side seam. The sweater I'm doing now, doesn't.


I ALWAYS start at the bottom of the sleeves. You can see the seam I'm aiming for in the pic above. It is very important to cut at the seam or you won't get a a continuous thread of yarn, you'll get little yarn bits (which make good stuffing by the way). I've marked the seam a bit with little pink dots in the next pic:


So take your seam ripper and just go at it slowly, rip the seam, stitch by stitch. If you're careful, you can find what I like to call "the sweet spot". You can pick and rip the seam until you find the magic thread that, if gently pulled, will separate the sleeve seam, and in most cases, come back down and separate the front/back seam:


Here it is! It took me one snip and I found the sweaters sweet spot. Rock on, let's watch it come apart a bit:


So now, you need to repeat this process for the other arm, front/back seam and neck. My separated sweater came apart in four pieces:


Now let the unraveling begin!

I always start with the arms, going from the top down. Here I've got my sleeve ready in my lap:


I'm way to impatient to properly start it, so I just cut off the edge like this:


Then you'll need to pick at it a bit to get it all on the same row and it'll just start unraveling:


I can tell from the weight of the thread that I'll want to at least double this yarn, so I'm rolling it directly into a center pull ball from both sleeves at the same:


And there you have it! Keep rolling untill you've rolled it all, and start knitting it up!

Now onto how to measure/skein your yarn!

Monday, October 22, 2007

The socks are done!


I love them.
I'm sorry, but I like the simplicity of the heel gusset area. I'll never knit a "proper" sock again, that's for sure.

I ran out of yarn, but who cares, they totally rock! And do you know how fun it is to take photos of your own feet?


I'm going to whip up some kids socks so I can play with, and perfect the pattern, then I'll post it for sure.

Sunday, October 21, 2007

Backwards loop cast on

I always use the long tail CO in all my projects. Always. Never more ye fools! Never! I really should be calling myself the fool. I teach the backward loop CO method to my friends, I've even taught it to my 5 yo daughter, who, I might add, has completely mastered it. As I CO my second sock of the pair I'm working on, I had a hankering to CO differently. I used the bakward loop method and I'm hooked. Just see for yourself how beautiful it is! It's also, easy, and super stretchy.


First pictured is the long tail cast on, with ribbing to follow, next is the backward loop with ribbing:


You can learn more about both these methods and more here: http://knittinghelp.com/knitting/basic_techniques/
 
Site Meter