Showing posts with label girls shirt. Show all posts
Sunday, July 18, 2010
New Pattern! Getting ready for fall.
This is my latest pattern. It"s a one piece pullover, knit back and forth, then in the round from the top down. My patterns are very portable since they are all knit in one piece rather than several pieces that need to be sewn together. I've had lots of ladies tell me they take my patterns on road trips or airplane trips and are very pleased at the ease of transport. Anyway, back to the pull over pattern, I knit this in cotton (I don't use animal fibers ever, not that I have a problem actually using it, I just don't like the feel of it on my skin and neither do my kids) but I don't see any reason why you couldn't use whatever fiber you prefer, just wash according to the label.
Materials needed:
US size 6 & 8 circular needles, 32 " long
400 (500)(600) yards of worsted weight cotton yarn
Darning needle
2 stitch holders (or two spare sets of smaller circular needles)
You can purchase this pattern for a mere $5.50 in my etsy shop: http://www.etsy.com/listing/44496247/girls-pullover-knitting-pattern
Monday, March 23, 2009
The Middle One Gets a Halter Top
I've decided to just keep going in order and ask each kid what they want me to knit when it's their turn, then I'll post my FO's here.
Ok, so hot off the needles...well, hot last night anyway, is a cute spring halter style top with a one button adjustable closure. She loves it! It was so simple that it's really just plain scary. I love simple knitting :)
Ok, here's the pattern:
Cast on 100 sts on size 3 circs, with the long tail cast on method, join and knit 1x1 rib for a couple/few inches
Change to size 5 circs and knit stockinette st (I tossed in some random stripes as I went, no rhyme or reason) for 7-8 inches give or take an inch or two to fit your desired recipiant.
Change back to size 3's and knit about 1.5 inches of 1x1 rib.
Cast off in rib fashion on size 5's
Grab the tail yarn from your cast on, and pick up 10 sts for the strap.
Knit garder stitch for about 12 inches, then add a button hole...starting at the beginning of a row, K5, BO2, K3, next row, cast on those 2 sts that you bound off and viola you have a button hole (you may need to make a button hold bigger then 2 sts, mine was actually a bead).
K2 rows, add button hole, k 2 more rows, add another button hole, K 2 more rows, then cast off, weave in end, attach button and put it on your kid and revel in your talent :)
This pattern is for personal use only. I charge a small fee for the right to sell your finished product. Please email me at : shelleefloyd@gmail.com for more info. Thanks :)
Friday, March 20, 2009
New Spring Shirt!
I'm getting the knitting bug with Spring arriving and, well, all the new hits help ;) I made my eldest gal a nice new pink spring shirt based on my cap sleep pattern. She loves it!

She's not one for posing, hence the crazy eyes ;)

I did make some increases along the way that are not in the original pattern, and she wanted ribbed sleeves instead of rolled.
She's not one for posing, hence the crazy eyes ;)
I did make some increases along the way that are not in the original pattern, and she wanted ribbed sleeves instead of rolled.
Friday, February 29, 2008
Friday, January 25, 2008
Kids strappy shirt, size 5-7 with pattern

Materials needed:
A bunch of sportweight cotton yarn (I never measured my amount, I'm sorry. I'm going to take a stab in the dark and say at least 400 yards)
US Size 3 long circs
US Size 5 long circs
Let's go!
Using the long tail CO method, and your sz 3 circs, CO 100 sts. Join and knit 1x1 ribbing for 3-4 inches.
K one round to end
switch to size 5's and K1M1 to end (I used an invisible method by making one on the yarn between two sts) (200sts)
K for two inches
Start texture....
rd 1, k2tog yo repeat to end
rd2, 3 and 4, k
rd 5 yo, k2tog
rd 6, 7 and 8, k
repeat these 8 rnds until you've reached your desired length
Add a few rows of garter st to prevent curling (or skip this is you like a curly look)
BO LOOSELY
Straps, pick up 6 st along CO edge, knit a 6inch long icord, attach to the back, do this twice for both straps. I just eyed where I thought the straps should go.
Weave those ends in and you're done!

This pattern is for personal use only. I charge a small fee for the right to sell your finished product. Please email me at : shelleefloyd@gmail.com for more info. Thanks :)
Thursday, January 3, 2008
Kid's Seamless Sweater


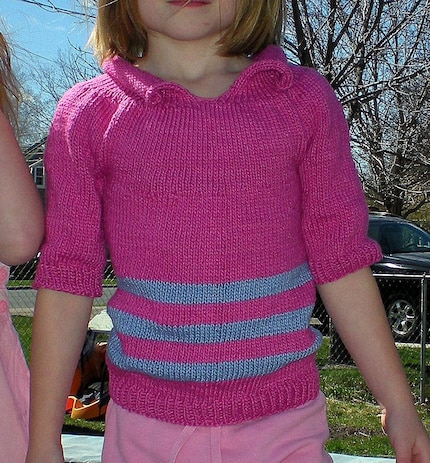
This is what I've had envisioned in my head since last summer. I can't believe I finally came up with how I want to do the sleeves. This was my 4th try at the sweater and I believe I've perfected it this time around. I'm sharing the pattern notes because I LOVE to share my learnings. I write my patterns very loosely, so if you've got any questions, please let me know and I can try to walk you through it.
My model wears a size 2-3t
I used the magic loop method on 32 in size 8 circs. The yarn was respun worsted weight, hand dyed cotton. I prepped 226 yards and didn't use all of it. 200 should do you just fine.
Gauge is 4 sts per inch in stockinette st.
neck:

co 60 sts
pm, join and work 1x1 rib for 2 inches
k one round
work one inc round, k2m1 (I pick up and k the yarn between two stitches as to be less noticeable)
k 5-7 rounds (remember, you're working with magic loop, so you can try the sweater on your kid!)
work one inc round.
k 8ish rounds, remember try it on to see if you're ready to start the arm holes yet.
At this point I've got 132 st on my needle. I have a feeling that I may have zoned out during the inc rounds so you may have a tad more or less then I do. that's no problem. This pattern is forgiving.
I'm going to explain the arm holes using my 132 sts, but if you have more/less, just know that each arm hole has 1/4 of the total stitches.
arm holes: starting at your marker, k16, place next 33 st on waste yarn, k33, place 33 on waste yarn, k to end of round
next round: k round rejoining at arm holes as if nothing weird is happening
k to desired length
work 5 rows garder st, bind off using a stretchy bo method
arms: (if you just pick up the stitches and start knitting, you'll need to sew up the hole in the pits afterward. I'm much too lazy for that. I do NOT like "finishing". So my trick was to sew up that little hole with 3 or 4 stitches with my darning needle BEFORE I even placed my sts back on my needle from the waste yarn. And another trick is to sew it from the pit down, that way your working yarn is already there for you)
Sew up pit hole (weave in end of yarn), place live sts back on your circs, join and work 1x1 rib for 10 rows, BO using a stretchy BO and do the same on the other arm.
Weave in the co and bo tail yarns and put this baby on your kid and admire your work!


This pattern is for personal use only. I charge a small fee for the right to sell your finished product. Please email me at : shelleefloyd@gmail.com for more info. Thanks :)
Subscribe to:
Posts (Atom)